Graveyard Keeper 2 Graveyard Rating — the Formula and Reaching Level 10
Published 2026-09-238 min read
How graveyard rating works in Graveyard Keeper 2: the min(decoration, white skulls) minus red skulls formula, corpse prep at the autopsy table, standalone buildings, and the fastest road to level 10.
Graveyard rating in Graveyard Keeper 2 is a running total, not a purchasable level. Every grave contributes its own score, decorative buildings add on top, and junk quietly subtracts. Reaching 10 in the early game comes down to one formula and one habit: never bury a corpse carelessly.
Quick answer
Bury corpses with white skulls, strip their red skulls at the autopsy table, then decorate up to each corpse's white-skull ceiling. Two or three clean graves plus a few standalone yard buildings push you past rating 10.
The burial score formula
Each grave scores:
Grave quality = min(decoration score, corpse's white skulls) − red skulls
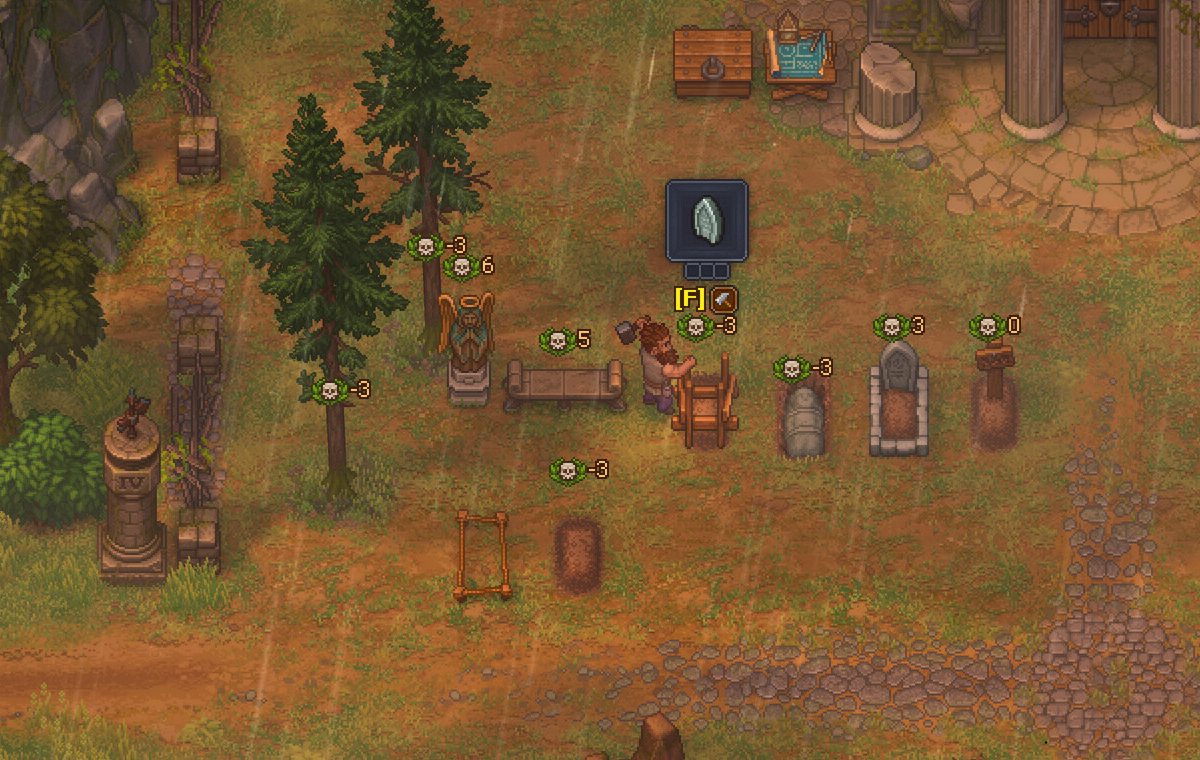
The min is everything. Decoration can never push a grave above the buried corpse's white-skull count: a +5 marble fence on a 2-white-skull corpse still returns +2. It works the other way too — a perfect 4-white-skull corpse on bare dirt scores zero. Red skulls then subtract from what's left, which is how careless burials leave your yard showing +6, +5, 0 and −3 all at once. Total graveyard rating = every grave's score plus the standalone decorative buildings placed around the yard.
Fix the corpse before the grave
Every body arriving at the morgue carries a mix of red skulls (penalties) and white skulls (decoration ceiling). The autopsy table is where you change that ratio — the single biggest lever on rating:
- Place the corpse on the autopsy table and interact. The panel lists extractable parts — skull, bones, skin, fat, flesh — alongside the corpse's current skull stats.
- Hover each part and read its icon before cutting. Some extractions remove red skulls; others take white skulls with them. Only take parts flagged as removing red skulls.
- Extract red-skull parts one at a time and watch the counters. Pulling the fat from a 2-red / 4-white corpse turns it into 1-red / 4-white — that's +1 to the eventual grave, for free.
- Stop the moment red skulls hit zero. Over-cutting a corpse degrades its overall quality and shrinks the very ceiling you're protecting.
A corpse that's all red skulls and no white skulls isn't worth materials at all. Leave it unburied and repurpose it — corrupted bodies make far better zombie workers than gravestones.
Freshness is a hard deadline
Corpses decay while above ground. Below 90% freshness, a corpse's burial score takes a heavy penalty no decoration can repair. Buried corpses stop decaying entirely, so the clock only runs between delivery and burial.
If a corpse has already crossed the line, don't waste a plot:
- Burn it at the cremation pile in the graveyard annex.
- Throw it in the river if the pile isn't unlocked yet — at a social cost.
- Send it to zombie resurrection, where freshness matters far less.
Expand the yard and place plots
Space comes from the new-graveyard blueprint menu. The first expansion, Graveyard Expansion 1, costs 12 stone — one short mining trip early on. With the zone unlocked, reopen the build menu, mark out a burial area, and place an empty grave plot inside it. Carry the prepared corpse from the morgue southeast to the churchyard and bury it; the grave's interface then shows the corpse's skull counts and its decoration slots.
Match decorations to the white-skull ceiling
Each grave takes one marker and one fence. The early carpentry workbench covers the basics, and the numbers are small enough to plan exactly:
| Decoration | Cost | Decoration score |
|---|---|---|
| Wooden cross | 2 wreaths | +2 |
| Wooden fence | 1 wreath | +1 |
Add them up against the corpse: a wooden cross plus a basic wooden fence is +3 decoration, so a 4-white-skull corpse still only yields +3 — the fourth point needs a fence upgrade. And buying ornate markers for a 2-white-skull corpse is pure waste.
Junk is the silent leak: every weed, stump and broken marker costs −2 rating at the bishop's weekly review, quietly erasing a good grave or two.
Score without any corpse: standalone buildings
Some objects add rating independent of skulls entirely — the fastest route to 10 because no corpse quality is involved:
- Stone lamp — +4 each
- Marble flower bed — +6 each
- Stone benches and prayer shrines — extra points
Line the outer path tiles with these before agonizing over any single grave. Outdoor benches placed through the base build menu boost the yard's total no matter what's buried underground. Just leave walking room — the modules fight your zombies for pathfinding space between the morgue and the church.
Replace the bad graves you dug early
Burials made before you understood the formula sit at 0 or negative forever — unless you dig them out:
- Interact with the offending grave and remove its marker. Only a marker-less plot offers the dig-up option.
- Exhume the poor corpse (you'll need an exhumation permit — 1 silver 75 copper — see our coffin guide), dispose of it, then place a properly prepared corpse in the empty plot and decorate to its white-skull ceiling.
The graveyard workbench dismantles headstones and fences so you can re-lay the plot wherever it scores best.
Confirming the rating climb
Every plot floats a visible skull tag, so the whole yard audits at a glance: walk it after each burial and confirm the new graves read positive, not zero. The graveyard map label also shows live skull totals in its corner.
Past 10, the milestones keep coming: +30 to consecrate the church at level 2, +100 for cathedral status, +200 for the noble citizen papers the town hall wants. Rating also feeds weekly sermon faith and the bishop's approval — so the same graveyard work quietly funds the rest of the game. Treat the morgue as a sorting station, not an assembly line: clean corpses to show graves, corrupted ones to the workforce, and rotted ones nowhere near the churchyard.